Step 1: Navigate to Settings
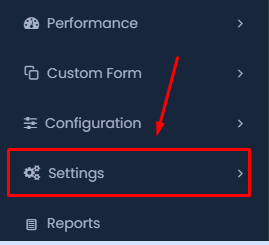
- Start by accessing the side navigation menu. Locate and click on the “Settings” option.
Step 2: Open Control Panel
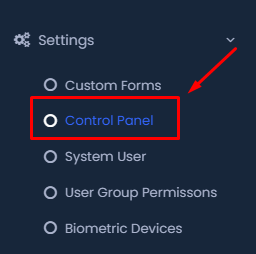
- Within the “Settings” menu, click on “Control Panel” under the available options.
Step 3: Access Organization Settings
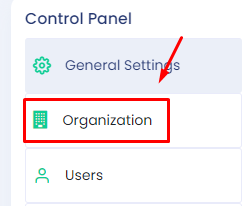
- In the Control Panel, select the “Organization” option to access the Organization Profile settings.
Step 4: Update Organization Name
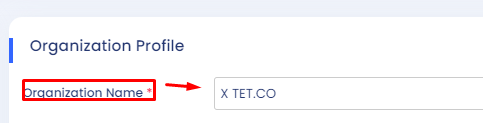
- In the “Organization Profile” section, enter the correct name for your organization in the “Organization Name” field.
Step 5: Update Contact Information

- Email: Enter your organization’s email address in the “Email” field.

- Address: Fill in your organization’s address in the “Address” field.

- Contact Number: Provide your organization’s contact number in the “Contact Number” field.

- Website: Enter the organization’s website URL in the “Website” field.
Step 6: Add Contact Person:

- Provide the name of the contact person for the organization in the “Contact Person” field.
Step 7: Upload Organization Image

- To upload an organization image, click on “Choose File,” select the appropriate image file, and upload it.
Step 8: Set Country

- In the “Organization Profile” section, enter your organization’s country in the “Country” field.
Step 9: Set Time Zone

- Specify the correct time zone for your organization by selecting from the “Time Zone” dropdown list.
Step 10: Set Currency

- Choose the appropriate currency for your organization from the “Currency” dropdown list.
Step 11: Upload Header Image

- Click “Choose File” next to “Upload Header Image” to select and upload an image that will be used as the header for your organization.
Step 12: Upload Footer Image

- Similarly, click “Choose File” next to “Upload Footer Image” to select and upload an image that will be used as the footer for your organization.
Step 13: Save Changes

- After updating all the fields, click “Save Changes” to ensure your organization’s profile is updated with the new settings.