Step 1: Access the Configuration Menu

- Click on the Configuration option within the Performance menu.
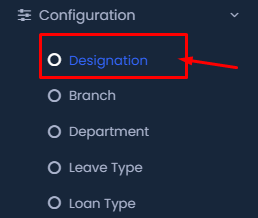
Step 2: Navigate to the Designation Settings

- In the Configuration menu, locate and click on the Designation option.
Step 3: Add a New Designation

- Click on the + Add Designation button at the top right of the Designation page.
Step 4: Fill in the Designation Details

- Designation Title: Enter the title of the designation in the provided field. This should be the official title used within your organization.

- Select Reporting Designation: Choose the reporting designation from the dropdown list. This sets up the hierarchy for the designation.

- Status: Toggle the status switch to activate or deactivate the designation.
Step 5: Save the Designation

- After filling out all the required fields, click the Save button to add the designation to the system.
Step 6: Import Designations

- If you have multiple designations to add, you can use the Import function.

- Click the Import button next to the Add Designation button.
- Select Template to download a sample file, or click Import to upload your prepared file.
Following these steps will allow you to efficiently manage designations within your HRMS system, ensuring that all employee roles are properly categorized and structured.
